Homemade Dinner Rolls from Scratch Recipe
Introduction
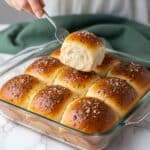
These dinner rolls from scratch are soft, fluffy, and perfect for any meal. With a tender crumb and buttery topping, they make an irresistible homemade bread that’s worth the effort. Whether for a holiday feast or a simple dinner, these rolls will impress your family and guests.

Ingredients
- 2 – 1/4 oz packages active dry yeast (NOT Rapid Rise)
- 1 Tbsp sugar
- ½ cup warm water (100℉-110℉)
- 5 cups all-purpose flour (aerated with a whisk and spooned to measure)
- ¼ cup sugar
- ½ Tbsp kosher salt
- 1 ½ cups warmed milk (100℉-110℉)
- ¼ cup canola oil
- 2 Tbsp salted butter (melted)
- 2 Tbsp salted butter (softened, to grease the pan)
- 3 Tbsp salted butter (melted, for brushing)
- ½ tsp kosher salt (for topping)
- ½ tsp sugar (for topping)
- ¼ tsp dried dill (for topping)
Instructions
- Step 1: In a 1-cup glass measuring cup, combine ½ cup warm water (100℉-110℉) with 1 Tbsp sugar. Stir briefly, then add the 2 packets of active dry yeast. Stir gently to incorporate and set aside for 8-10 minutes until the mixture blooms and bubbles to the top.
- Step 2: While the yeast blooms, whisk the 5 cups of flour to aerate it. In a stand mixer bowl with a paddle attachment, combine the flour, ¼ cup sugar, and ½ Tbsp kosher salt. Mix on low for 30 seconds to blend.
- Step 3: Warm 1 ½ cups milk to 100℉-110℉ in a microwave-safe cup, then stir in ¼ cup canola oil.
- Step 4: With the mixer running on low, gradually add the milk and oil mixture to the flour mixture just until combined.
- Step 5: Add the bloomed yeast mixture to the dough and mix until sticky and combined.
- Step 6: Switch to a dough hook and knead for 6-7 minutes until dough is tacky, elastic, and begins to pull away from the sides. If too sticky after 3-4 minutes, add 1-2 Tbsp flour, up to ¼ cup.
- Step 7: Turn the dough onto a lightly floured surface, shape into a ball, then place it in a greased large bowl. Turn to coat in oil, cover with a towel or plastic wrap, and let rise in a warm place for 1 ½ hours, until doubled or tripled in size.
- Step 8: Grease a 9×13-inch glass baking dish with softened butter.
- Step 9: Punch down the dough and turn it onto a floured surface. Cut into 24-30 equal pieces.
- Step 10: Shape each piece into smooth balls by pulling dough edges underneath and rolling lightly on a clean, non-floured counter until round and slightly tacky.
- Step 11: Place dough balls seam side down in the greased pan, arranged in 6 rows of 3 (18 rolls), or distribute across two smaller pans if preferred.
- Step 12: Cover and let the rolls rise again until doubled in size, about 40 minutes. Preheat oven to 350℉ during this time.
- Step 13: Lightly brush the tops with melted butter. Bake at 350℉ for 25 minutes, until golden brown and cooked through.
- Step 14: While baking, combine ½ tsp kosher salt, ½ tsp sugar, and ¼ tsp dried dill in a small dish.
- Step 15: Remove rolls from oven and immediately brush with melted butter. Sprinkle with the salt-dill mixture to finish.
Tips & Variations
- Whisking the flour before measuring helps keep the rolls light and fluffy.
- If dough feels too sticky during kneading, add flour gradually but avoid making it stiff.
- For a softer crust, brush with melted butter right after baking.
- Try adding garlic powder or herbs to the topping for a flavor twist.
- To freeze, shape rolls after the first rise, freeze individually, then bake after thawing and a second rise.
Storage
Store cooled rolls in an airtight container at room temperature for up to 3 days. For longer storage, freeze baked rolls wrapped tightly for up to 3 months. Reheat frozen or room temperature rolls in a warm oven until soft and warm, about 10-15 minutes at 300℉.
How to Serve

Serve this delicious recipe with your favorite sides.
FAQs
Can I use rapid rise yeast instead of active dry yeast?
This recipe calls for active dry yeast to ensure a proper rise and texture. Rapid rise yeast behaves differently and may alter the dough’s development and rise times, so it’s best to stick with active dry yeast.
Can I prepare the dough ahead of time?
Yes, you can prepare the dough through the first rise, then shape the rolls and refrigerate them covered for up to 1 day before the second rise and baking. This slows yeast activity and allows for convenient timing.
PrintHomemade Dinner Rolls from Scratch Recipe
Classic homemade dinner rolls made from scratch with active dry yeast, resulting in soft, fluffy, and buttery rolls perfect for any meal. This recipe includes detailed steps for making the dough, rising, shaping, baking, and a flavorful butter and dill topping, with options for making ahead and freezing.
- Prep Time: 20 minutes
- Cook Time: 25 minutes
- Total Time: 2 hours 35 minutes
- Yield: 24–30 dinner rolls 1x
- Category: Bread
- Method: Baking
- Cuisine: American
Ingredients
Yeast Mixture
- 2 – 1/4 oz packages active dry yeast (NOT rapid rise)
- 1 Tbsp sugar
- ½ cup warm water (100℉-110℉)
Dough
- 5 cups all-purpose flour (aerated with a whisk and spooned to measure)
- ¼ cup sugar
- ½ Tbsp kosher salt
- 1 ½ cups warmed milk (100℉-110℉)
- ¼ cup canola oil
Butter
- 2 Tbsp salted butter (melted, for brushing tops before baking)
- 2 Tbsp salted butter (softened, to grease pan)
- 3 Tbsp salted butter (melted, for brushing after baking)
Topping
- ½ tsp kosher salt
- ½ tsp sugar
- ¼ tsp dried dill
Instructions
- Bloom Yeast: In a 1-cup glass measuring cup, combine ½ cup warm water (100℉-110℉) with 1 Tbsp sugar. Stir to dissolve, then sprinkle in 2 packages of active dry yeast. Stir gently to incorporate and set aside for 8-10 minutes until the mixture bubbles and blooms on top.
- Mix Dry Ingredients: In a stand mixer bowl with a paddle attachment, whisk together 5 cups aerated all-purpose flour, ¼ cup sugar, and ½ Tbsp kosher salt. Mix for 30 seconds to combine evenly.
- Prepare Wet Mixture: Warm 1 ½ cups milk to 100℉-110℉ in 30-second increments in the microwave. Immediately stir in ¼ cup canola oil.
- Combine Ingredients: Gradually add the warm milk and oil mixture to the flour mixture while the mixer runs on low, mixing just until combined.
- Add Yeast: Add the bloomed yeast mixture to the dough. The dough will be sticky.
- Knead Dough: Replace the paddle attachment with a dough hook. Knead the dough in the mixer for 6-7 minutes until tacky but slightly pulling from bowl sides with an elastic texture. If still too wet after 3-4 minutes, add 1-2 Tbsp more flour up to ¼ cup.
- First Rise: Turn dough onto a lightly floured surface and shape into a smooth ball. Grease a large bowl, place the dough in it, turning to coat with oil. Cover with a clean towel or loose plastic wrap and let rise in a warm place for 1 ½ hours until doubled or tripled in size.
- Prepare Pan: Grease a 9×13-inch glass baking dish with softened butter and set aside.
- Divide Dough: Punch down the risen dough and transfer to a floured surface. Cut the dough into 24-30 equal pieces using a bench scraper, knife, or pizza wheel.
- Shape Rolls: Shape each piece into a smooth ball by folding edges underneath, then roll seam side down on a clean, non-floured surface with your hand in a circular motion until smooth and tacky.
- Arrange Rolls: Place the dough balls seam side down in the greased baking dish in 6 rows of 3 for 18 rolls, leaving space for others in a second pan or freezing.
- Second Rise: Cover the pan and allow rolls to rise for about 40 minutes until doubled in size.
- Preheat Oven: Preheat oven to 350℉ while rolls are rising.
- Brush with Butter: Lightly brush the tops of risen rolls with 2 Tbsp melted salted butter before baking.
- Bake Rolls: Bake in preheated oven for approximately 25 minutes until golden brown on top and cooked through in the center.
- Prepare Topping: While baking, mix ½ tsp kosher salt, ½ tsp sugar, and ¼ tsp dried dill in a small dish.
- Finish Rolls: Immediately remove rolls from the oven, brush generously with 3 Tbsp melted butter, and sprinkle with the dill-salt-sugar mixture. Use as desired.
- Make Ahead Option: After first rise, form rolls and place 1 inch apart in greased pans. Cover tightly and refrigerate to arrest yeast activity. On day 2, allow to rise at room temperature for 1.5 hours before baking as usual.
- Freezing Option: After first rise, form rolls and place on greased or parchment-lined pans. Freeze quickly, then once frozen, transfer to freezer-safe bags for up to 3 months. For baking, thaw and rise at room temperature 4-5 hours, then bake as directed.
Notes
- Aerate flour by whisking before measuring for lighter rolls.
- Use active dry yeast, not rapid rise, for best texture.
- Knead dough until elastic but slightly tacky, adding flour cautiously to avoid dryness.
- Rolls can be made ahead and refrigerated or frozen after shaping to save time.
- Use a warm place for rising dough to encourage proper fermentation.
- The dill-salt topping adds a savory and aromatic finish but can be omitted if preferred.
- Ensure oven temperature is accurate for even baking and golden crust.
- To keep rolls soft longer, store covered after cooling.
Keywords: dinner rolls, homemade bread, yeast rolls, soft rolls, buttery rolls, bread recipe from scratch, make ahead rolls, freezer friendly rolls