Crunchy Chicken Katsu Musubi Recipe
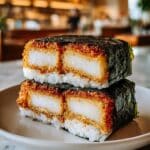
Crunchy Chicken Katsu Musubi is a delicious fusion snack combining crispy Japanese-style fried chicken cutlets with savory sushi rice, wrapped in nori seaweed. This handheld treat features tender pounded chicken thighs coated in a light batter and panko breadcrumbs, fried to golden perfection, then layered atop seasoned sushi rice with tangy tonkatsu sauce and wrapped in nori for a satisfying texture contrast. Perfect as a flavorful lunch, snack, or party appetizer.
- Prep Time: 15 minutes
- Cook Time: 20 minutes
- Total Time: 35 minutes
- Yield: 3 musubi pieces 1x
- Category: Snack
- Method: Frying
- Cuisine: Japanese-Hawaiian Fusion
Ingredients
Scale
Chicken Katsu
- 2 pieces boneless chicken thighs (skinless for easier preparation)
- 1 large egg (can substitute with flax egg for vegan option)
- 0.5 cup all-purpose flour (can swap for gluten-free flour)
- Salt, to taste
- Ground black pepper, to taste
- 1 cup panko breadcrumbs (or crushed cornflakes for gluten-free)
- As needed neutral oil (for frying, such as canola or vegetable)
Musubi Assembly
- 3 sheets nori (cut into thirds)
- 1 cup sushi rice (short-grain brown rice recommended for nuttier flavor)
- Tonkatsu sauce, to taste (can substitute with teriyaki or hoisin sauce)
Instructions
- Pound the Chicken: Place the boneless chicken thighs between two sheets of plastic wrap. Using a meat mallet, gently pound the chicken to a uniform thickness of about ½ inch to ensure even cooking and tender texture.
- Prepare the Batter: In a medium bowl, whisk together the egg, all-purpose flour, salt, and ground black pepper until smooth and slightly loose, resembling pancake batter.
- Coat the Chicken: Carefully dredge each piece of the pounded chicken in the batter, making sure it is fully coated, then press into the panko breadcrumbs to cover the chicken in a crunchy layer.
- Fry the Chicken: Heat a skillet over medium-high heat and add enough neutral oil to cover the bottom. Fry the breaded chicken pieces for 4 to 6 minutes on each side, or until they are golden brown and cooked through. Remove and drain on paper towels.
- Cook the Rice: Prepare the sushi rice according to package instructions. Once cooked, let the rice cool slightly so it is sticky enough to hold musubi shape but not too hot to handle.
- Assemble Musubi: Cut each nori sheet into thirds. Place half a cup of the cooked sticky rice inside a musubi mold (or shape by hand), drizzle with tonkatsu sauce, and top with a piece of fried chicken katsu. Wrap the nori around the filled rice and chicken to secure it.
- Rest and Serve: Let the assembled musubi rest for a minute to allow the nori to soften and seal around the filling. Slice in half if desired, and serve immediately for best texture and flavor.
Notes
- For a gluten-free option, substitute all-purpose flour with gluten-free flour and panko breadcrumbs with crushed cornflakes.
- To make vegan, use a flax egg in place of the egg and select vegan-friendly tonkatsu or hoisin sauce.
- Use a musubi mold for consistent shape or form by hand with wet fingers to prevent sticking.
- Be sure not to overcrowd the skillet when frying to maintain oil temperature and achieve crispiness.
- Cooked musubi is best enjoyed fresh but can be wrapped tightly and stored in the refrigerator for up to 1 day.
Keywords: Chicken Katsu Musubi, Japanese snack, fried chicken rice balls, musubi recipe, tonkatsu sauce, crispy chicken snack