
Cheesy Taco Rice Recipe
If you’re craving a dish that delivers all the vibrant flavors of your favorite taco but in a comforting, easy-to-make one-pot meal, this Cheesy Taco Rice is about to become your new best friend. It’s packed with seasoned ground beef, tender rice soaked in rich tomato and beef broth flavors, and of course, loads of melty cheese that brings everything together in a warm, hearty hug of a meal. Whether you need a quick weeknight dinner or a delicious dish to impress guests, Cheesy Taco Rice hits every note of comforting, flavorful, and downright addictive.

Ingredients You’ll Need
The beauty of this Cheesy Taco Rice recipe is in its simplicity. Each ingredient plays a crucial role to build layers of flavor and texture, creating a perfectly balanced dish that’s satisfying from the very first bite.
- Olive oil: Helps brown the beef and onion while adding a subtle richness.
- Ground beef: Your protein base that soaks up all the tasty taco seasonings.
- Yellow onion: Adds sweetness and depth when cooked until translucent.
- Garlic: Provides a fragrant punch that’s essential in any savory dish.
- Taco seasoning packet: The blend that brings the authentic taco flavor to the dish.
- Beef broth: Keeps the rice moist and infuses it with savory goodness.
- Rotel (diced tomatoes with green chilies): Adds a zesty kick and vibrant color.
- Tomato paste: Gives a concentrated tomato flavor that deepens the sauce.
- Long-grain white rice: Absorbs all the flavors while keeping a nice, fluffy texture.
- Shredded cheese: The crowning glory—gooey, melty, and indulgent.
How to Make Cheesy Taco Rice
Step 1: Brown the Beef and Onions
Start by warming olive oil in a large skillet over medium-high heat, then add your ground beef and diced onion. Cook and crumble the beef until it’s no longer pink and the onions have turned translucent, about 8 to 10 minutes. Be sure to drain off any excess grease for a cleaner-tasting dish.
Step 2: Add Seasonings
Next, toss in the minced garlic and the taco seasoning packet. Stir everything together and cook for just about 30 seconds. This brief cooking helps release the spices’ aroma, giving the beef a bold taco flavor without overwhelming the dish.
Step 3: Mix in Liquids and Rice
Pour in the beef broth, the entire can of Rotel, and the tomato paste, stirring thoroughly to combine all those vibrant ingredients. Bring this mixture to a boil, then add the uncooked long-grain white rice. Give it a quick stir and allow it to return to a boil. This ensures the rice will start soaking in all the delicious liquids evenly.
Step 4: Simmer
Once boiling again, cover your skillet with a lid and reduce the heat to medium-low or low. Let it cook for 15 minutes, which allows the rice to absorb those spicy, savory flavors without drying out. Resist the urge to lift the lid during this time—that trapped steam is the key to perfectly cooked rice.
Step 5: Add Cheese
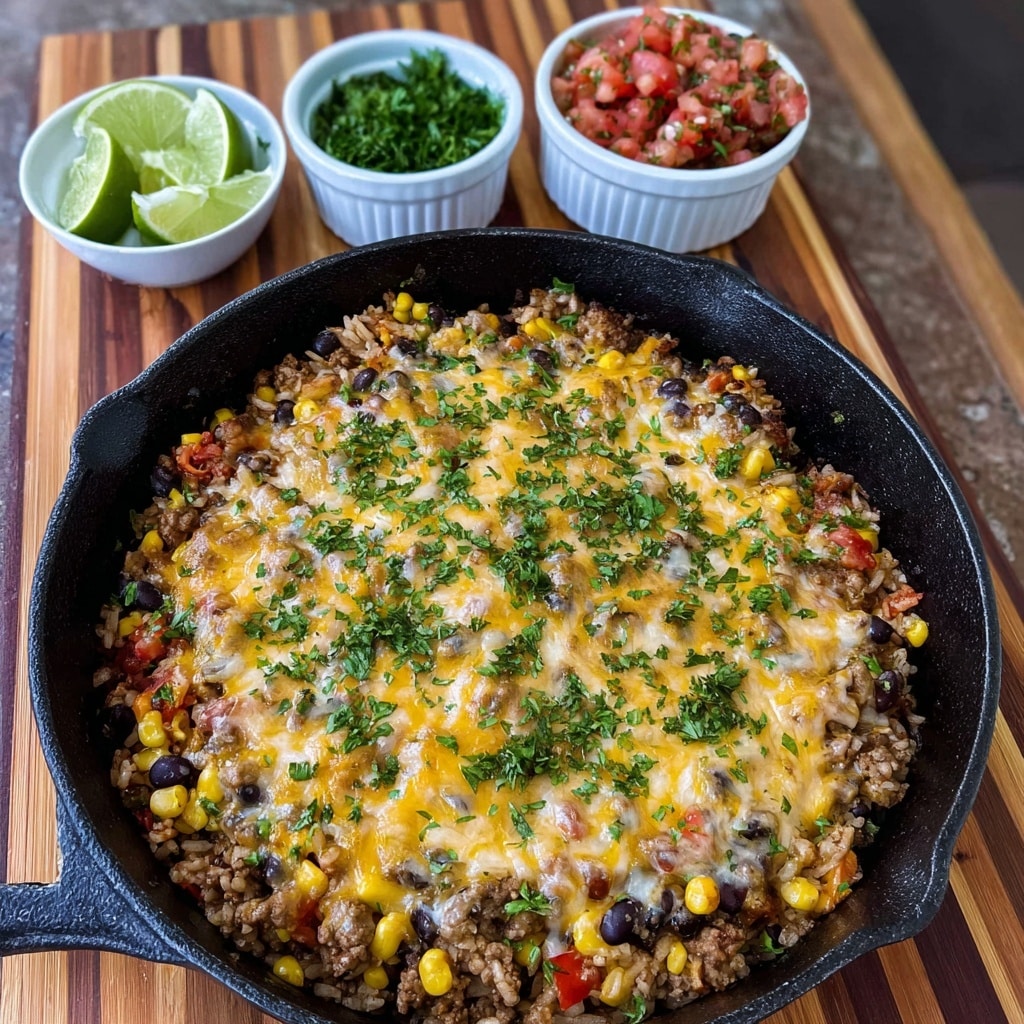
Finally, sprinkle the shredded cheese evenly on top of the rice mixture. Cover and cook for an additional 5 minutes, or until all the cheese has melted into a creamy, decadent layer. This cheesy finish is what takes the dish from great to absolutely crave-worthy.
How to Serve Cheesy Taco Rice
Garnishes
Top your Cheesy Taco Rice with fresh, vibrant garnishes like sour cream for creaminess, guacamole for a buttery contrast, zesty pico de gallo to add brightness, and chopped fresh cilantro for a pop of herbal freshness. These garnishes not only add flavor but also texture and visual appeal that make every bite a little more special.
Side Dishes
This dish pairs beautifully with a crunchy side salad, some warm tortilla chips, or even a side of roasted vegetables to balance the meal. A simple Mexican street corn salad or fresh avocado slices also complement the rich, cheesy flavors of the rice perfectly.
Creative Ways to Present
Feeling adventurous? Serve Cheesy Taco Rice in a warm tortilla bowl for a fun presentation, or layer it in a burrito bowl with extra toppings like black beans, corn, and jalapeños for a colorful fiesta on your plate. You can even turn the leftovers into stuffed bell peppers for a whole new twist!
Make Ahead and Storage
Storing Leftovers
If you have any leftover Cheesy Taco Rice, let it cool completely before transferring it to an airtight container. Stored in the refrigerator, it will stay fresh for up to 3-4 days. The flavors often meld even more during this time, making your second helping just as good as the first.
Freezing
Cheesy Taco Rice can be frozen, but keep in mind the texture of the rice may change slightly. To freeze, portion the rice into freezer-safe containers or bags and freeze for up to 2 months. Thaw overnight in the refrigerator before reheating for best results.
Reheating
Reheat your Cheesy Taco Rice gently either in a skillet over medium heat or in the microwave. If it seems dry, add a splash of beef broth or water to bring back the moisture and prevent the rice from drying out. Stir occasionally to heat it evenly and keep that cheesy goodness flowing.
FAQs
Can I use ground turkey or chicken instead of beef?
Absolutely! Ground turkey or chicken are great leaner alternatives that still absorb the taco seasoning well. Just adjust cooking times slightly, as poultry cooks faster than beef.
What kind of cheese works best for Cheesy Taco Rice?
Cheddar is the classic choice, but feel free to mix it up with Monterey Jack, Pepper Jack for a spicy kick, or even a Mexican blend. The key is to use a cheese that melts smoothly to get that perfect gooey texture.
Is it necessary to use Rotel or can I use fresh tomatoes?
Rotel gives a nice balance of diced tomatoes with mild green chilies, adding both flavor and a little heat. You can substitute with fresh diced tomatoes and a chopped jalapeño if you prefer, but the canned version keeps it simple and flavorful.
Can I make this recipe gluten-free?
Yes! The Cheesy Taco Rice is naturally gluten-free as long as your taco seasoning does not contain any gluten additives. Double-check your seasoning packet or use a homemade blend to be sure.
How spicy is this dish?
The spice level is mild to medium, mainly coming from the taco seasoning and Rotel. If you want it milder, use a mild taco seasoning or reduce the amount of Rotel, and add fresh toppings to control the heat to your liking.
Final Thoughts
This Cheesy Taco Rice is truly a crowd-pleaser—comforting, flavorful, and so simple to make. It brings together the best parts of taco night in a single bowl that feels like a warm hug. I can’t wait for you to try it and see how it quickly becomes a go-to meal in your kitchen, ready to brighten up busy weeknights or casual get-togethers with friends and family.
PrintCheesy Taco Rice Recipe

Cheesy Taco Rice is a comforting, one-pan dish combining seasoned ground beef, long-grain white rice, and melty shredded cheese. Infused with bold taco flavors from spices and Rotel tomatoes, this recipe is perfect for a quick and satisfying weeknight dinner. Ready in under 40 minutes, it pairs wonderfully with fresh toppings like sour cream, guacamole, and cilantro for a delicious Mexican-inspired meal.
- Prep Time: 10 minutes
- Cook Time: 25 minutes
- Total Time: 35 minutes
- Yield: 4 servings 1x
- Category: Main Dish
- Method: Skillet Cooking
- Cuisine: Mexican American
- Diet: Halal
Ingredients
Meat and Aromatics
- 1 tablespoon olive oil
- 1 pound ground beef
- 1 small yellow onion, finely diced
- 2 cloves garlic, minced
Seasonings and Liquids
- 1 packet taco seasoning (about 1 oz)
- 2¼ cups beef broth
- 1 (10 oz) can Rotel (diced tomatoes and green chilies)
- 2 tablespoons tomato paste
Grains and Cheese
- 1½ cups long-grain white rice (dry, uncooked)
- 2 cups shredded cheese (cheddar, Monterey Jack, or a blend)
Instructions
- Brown Beef and Onions: In a large skillet over medium-high heat, heat the olive oil. Add the ground beef and diced onion. Cook and crumble the beef until it is no longer pink and the onions are translucent, about 8-10 minutes. Drain any excess grease from the pan to keep the dish from being greasy.
- Add Seasonings: Stir in the minced garlic and taco seasoning packet to the cooked beef and onions. Cook for about 30 seconds until fragrant to unlock the spices’ flavors.
- Add Liquids and Rice: Pour in the beef broth, canned Rotel, and tomato paste. Stir well until everything is combined. Bring the mixture to a boil. Once boiling, stir in the dry rice and bring back to a boil to start the cooking process for the rice.
- Simmer: Cover the skillet with a lid and reduce the heat to medium-low or low. Let the rice simmer for 15 minutes, allowing it to absorb the flavorful liquids and cook through properly.
- Add Cheese: Sprinkle the shredded cheese evenly over the top of the skillet. Cover and cook for an additional 5 minutes or until the cheese melts completely and becomes gooey.
- Serve: Fluff the cheesy taco rice gently with a fork. Serve hot with your favorite taco toppings such as sour cream, guacamole, pico de gallo, and chopped fresh cilantro for added freshness and texture.
Notes
- Be sure to drain excess grease after browning the beef to avoid a greasy final dish.
- For extra flavor, you can add diced jalapeños or a dash of hot sauce along with the taco seasoning.
- This recipe works well with leftover cooked rice; just adjust the liquid accordingly.
- Substitute ground turkey or chicken for a leaner protein option.
- Use a blend of cheeses like cheddar and Monterey Jack for richer flavor and meltability.
- Ensure you cover the pan while simmering to properly cook the rice evenly.
Nutrition
- Serving Size: 1 cup
- Calories: 450
- Sugar: 3g
- Sodium: 820mg
- Fat: 22g
- Saturated Fat: 9g
- Unsaturated Fat: 11g
- Trans Fat: 0.2g
- Carbohydrates: 38g
- Fiber: 3g
- Protein: 27g
- Cholesterol: 75mg
Keywords: cheesy taco rice, taco rice skillet, ground beef taco rice, one pan taco rice, easy Mexican dinner