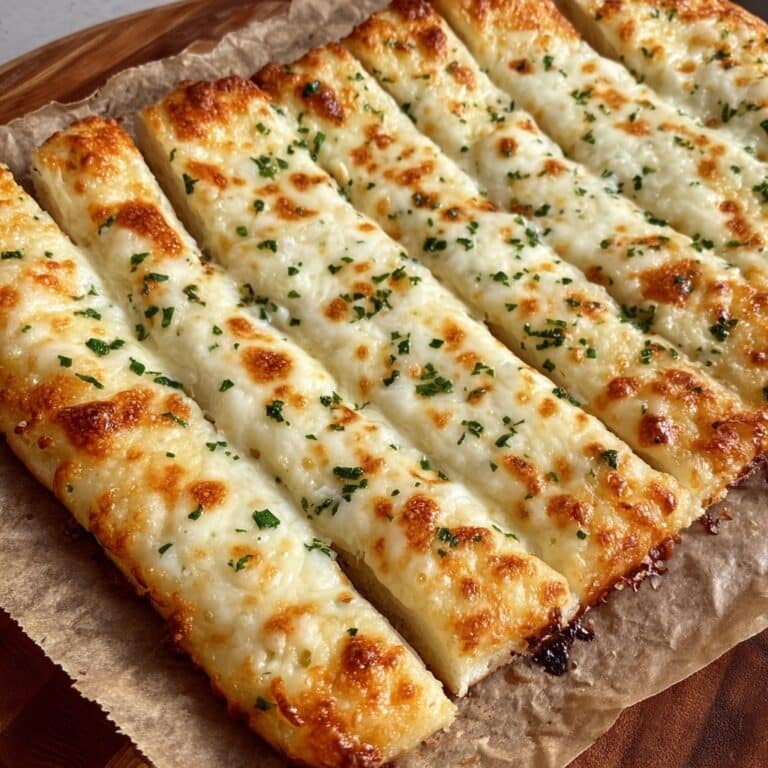
Tasty Cheesy Garlic Bread Recipe
If you are craving something warm, melty, and bursting with flavor, this Tasty Cheesy Garlic Bread recipe is exactly what you need. It brings together the rich creaminess of melted cheeses, the bold punch of garlic, and the subtle nutty undertones of almond meal for a snack or side that is truly irresistible. Whether served as an appetizer or a complement to your meal, this Tasty Cheesy Garlic Bread offers the perfect combination of crisp edges and soft, cheesy center that will have everyone reaching for more.
Ingredients You’ll Need
Every ingredient here plays a crucial role, making the Tasty Cheesy Garlic Bread both simple to prepare and unforgettable in taste. From the savory cheeses to the fresh herbs, each component adds layers of texture and flavor that come together beautifully.
- Melted butter: Used to coat the baking dish, this adds richness and helps prevent sticking.
- Fine almond meal (140g/5 ounces): A gluten-free base that adds a subtle nutty flavor and tender crumb.
- Finely grated parmesan (2 tablespoons): Infuses a sharp, salty depth to the bread.
- Baking soda (½ teaspoon): Helps the bread rise slightly and develop a light texture.
- Garlic powder (1 teaspoon): Provides a gentle garlic aroma throughout the bread.
- Shredded mozzarella, part-skim (170g/6 ounces): Melts beautifully to create a stretchy, gooey texture.
- Cream cheese (28g/1 ounce): Adds creaminess and binds the ingredients together.
- Large egg (1, beaten until fluffy): Gives structure and helps everything hold together.
- Warm butter (2 tablespoons): Mixed with garlic and parsley to create an irresistible topping.
- Finely chopped garlic cloves (2): Fresh garlic adds sharpness and vibrant flavor to the topping.
- Fresh chopped parsley (2 tablespoons): Brings a fresh, herbaceous note and a pop of color.
How to Make Tasty Cheesy Garlic Bread
Step 1: Prepare Your Oven and Dish
Start by preheating your oven to 175°C (350°F). While it’s heating, generously coat a 20cm (8-inch) square glass or ceramic dish with melted butter. This simple step ensures the bread won’t stick and bakes up with a golden crust.
Step 2: Mix Dry Ingredients
Combine the fine almond meal, grated parmesan, baking soda, and garlic powder in a bowl. This blend forms the flavorful and slightly nutty base of your bread, setting the stage for all the melty goodness to come.
Step 3: Melt the Cheeses
Place the shredded mozzarella and cream cheese in a microwave-safe bowl. Heat for 30 seconds, stir, then heat for another 40 seconds until everything is nicely melted together. The warm cheese mixture brings the creamy texture that makes this bread incredibly comforting.
Step 4: Combine Ingredients Quickly
Immediately stir the melted cheese blend, then add the dry ingredients and beaten egg. Use a spatula first, then your hands to mix quickly while warm. The dough will be sticky—that’s exactly as it should be! Mash everything until it’s well combined and ready to spread into the dish.
Step 5: Bake Until Puffy and Golden
Spoon the mixture evenly into the buttered dish. Bake for about 20 minutes or until the bread is puffy and has a golden hue. Keep an eye starting at 15 minutes to avoid over-browning—that perfect golden color means it’s ready.
Step 6: Prepare and Brush the Garlic Butter
While the bread is baking, mix warm butter with chopped garlic and fresh parsley in a small bowl. As soon as you pull the bread out of the oven, brush this fragrant garlic butter all over the top. This step infuses your creation with that irresistible garlicky aroma.
Step 7: Rest and Serve
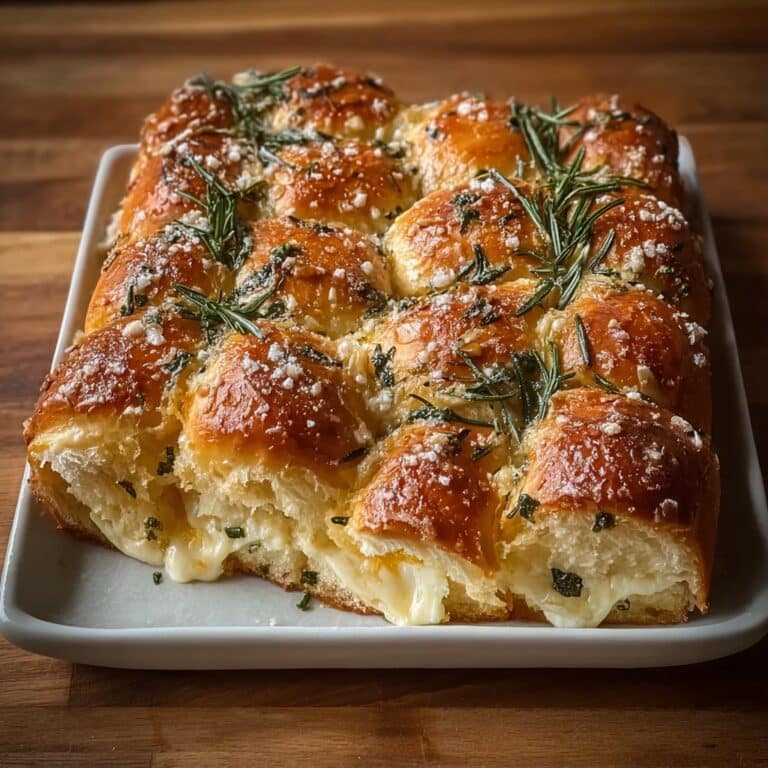
Allow the bread to sit in the pan for about 5 minutes so it firms up just enough to hold its shape when cut. Then slice into pieces and get ready to enjoy a dish that’s every bit as tasty as it looks.
How to Serve Tasty Cheesy Garlic Bread
Garnishes
A sprinkle of additional fresh parsley or even a dash of red pepper flakes can elevate your Tasty Cheesy Garlic Bread to the next level. These simple garnishes add fresh color, a little zing, and make the plate look utterly inviting.
Side Dishes
This cheesy garlic bread pairs fabulously with a fresh garden salad or a warm bowl of tomato soup. Its rich, savory flavor contrasts beautifully with light, crisp vegetables or the tangy notes of tomatoes, creating a balanced and satisfying meal.
Creative Ways to Present
Serve your Tasty Cheesy Garlic Bread cut into bite-sized squares on a wooden board with small bowls of dipping sauces like marinara, ranch, or pesto. This interactive presentation is perfect for gatherings, making it fun and easy for everyone to enjoy.
Make Ahead and Storage
Storing Leftovers
If you have any Tasty Cheesy Garlic Bread left over, store it tightly wrapped in the refrigerator. It will keep well for up to 3 days, maintaining that wonderful cheesy goodness, ready for a quick snack or side later.
Freezing
You can freeze the bread before or after baking. Wrap it well in plastic wrap followed by aluminum foil to protect against freezer burn. When frozen, it will stay fresh for up to 2 months, making it convenient to enjoy any time.
Reheating
To bring your Tasty Cheesy Garlic Bread back to life, reheat it in the oven at 175°C (350°F) for 10-15 minutes until warmed through. This method keeps the bread soft inside while restoring that crispy, golden crust everyone loves.
FAQs
Can I use regular bread instead of almond meal?
This recipe is designed for a gluten-free almond meal base, which gives it a unique texture and flavor. Using regular bread won’t produce the same result, but you can find many traditional garlic bread recipes if you prefer.
Is it possible to make this vegan?
While this version relies on cheeses and eggs, you can experiment with vegan cheese alternatives and egg substitutes. Keep in mind the texture and flavor will differ, but it’s worth trying if you want a dairy-free option.
How do I make the bread less sticky?
The dough’s stickiness comes from the melted cheese and almond meal. Working quickly and using lightly oiled hands can help, but a bit of stickiness is normal and helps keep everything together.
Can I add extra herbs or spices?
Absolutely! Feel free to add your favorite herbs like oregano or thyme to the dry mix or sprinkle some chili flakes for a spicy twist. The recipe is flexible and welcomes creativity.
What’s the best way to cut the bread?
Use a sharp knife after the bread has rested and cooled for a few minutes. This makes slicing easier and keeps the pieces neat, perfect for sharing or serving.
Final Thoughts
There is something truly comforting about the warm, melty, and flavorful qualities of this Tasty Cheesy Garlic Bread. Whether you’re serving it as a side, an appetizer, or a snack, it never fails to impress and satisfy. I encourage you to give this recipe a go—your taste buds will thank you!
PrintTasty Cheesy Garlic Bread Recipe

This Tasty Cheesy Garlic Bread is a low-carb, gluten-free delight perfect for snacking or serving as a side. Made with almond meal, mozzarella, parmesan, and infused with rich garlic butter, it offers a golden, puffy texture and irresistible cheesy flavor.
- Prep Time: 10 minutes
- Cook Time: 20 minutes
- Total Time: 30 minutes
- Yield: 8 servings 1x
- Category: Side Dish
- Method: Baking
- Cuisine: Italian-inspired
- Diet: Gluten Free
Ingredients
Base
- 1 tablespoon melted butter to coat the dish
Bread
- 140g fine almond meal (5 ounces)
- 2 tablespoons finely grated parmesan
- ½ teaspoon baking soda
- 1 teaspoon garlic powder
- 170g shredded mozzarella, part-skim (6 ounces)
- 28g cream cheese (1 ounce)
- 1 large egg, beaten until fluffy
Topping
- 2 tablespoons warm butter
- 2 garlic cloves, finely chopped
- 2 tablespoons fresh chopped parsley
Instructions
- Preheat the Oven: Heat your oven to 175°C (350°F). Coat a 20cm (8-inch) square glass or ceramic dish with melted butter. Alternatively, you can use a 1.5-quart oval dish about 5cm (2 inches) deep.
- Mix Dry Ingredients: In a small bowl, combine the almond meal, finely grated parmesan, baking soda, and garlic powder until well mixed.
- Melt Cheeses: Place the shredded mozzarella in a microwave-safe bowl and add the cream cheese on top. Microwave for 30 seconds, stir, then heat for another 40 seconds until fully melted and smooth.
- Combine Ingredients: Immediately stir the melted cheese mix, then add the dry mixture and the beaten egg. Use a spatula initially, then knead with your hands quickly while the cheese is warm to achieve a sticky, uniform dough.
- Shape and Bake: Spread the dough evenly in the buttered dish. Bake in the preheated oven for about 20 minutes until the bread is puffy and golden. Begin checking at 15 minutes to avoid over-browning.
- Prepare Topping: While baking, mix warm butter with finely chopped garlic and fresh parsley in a small bowl to create the garlic butter topping.
- Brush and Cool: Once out of the oven, immediately brush the garlic butter evenly over the hot bread. Allow the bread to rest in the pan for about 5 minutes to firm up before slicing and serving.
Notes
- Use fine almond meal for best texture; coarse meal may yield a denser bread.
- Make sure to work quickly when mixing the dough since the cheese cools and hardens fast.
- Check on the bread periodically after 15 minutes to prevent burning.
- Feel free to substitute fresh herbs like basil or oregano in the garlic butter for variation.
- This bread is best served warm but can be reheated gently to restore softness.
Nutrition
- Serving Size: 1 slice (1/8 of recipe)
- Calories: 190
- Sugar: 1g
- Sodium: 230mg
- Fat: 15g
- Saturated Fat: 7g
- Unsaturated Fat: 6g
- Trans Fat: 0g
- Carbohydrates: 4g
- Fiber: 2g
- Protein: 10g
- Cholesterol: 55mg
Keywords: cheesy garlic bread, low carb garlic bread, gluten free bread, almond meal bread, keto garlic bread, mozzarella garlic bread