Chocolate Dacquoise with Hazelnut and Caramel Whipped Cream Recipe
Introduction
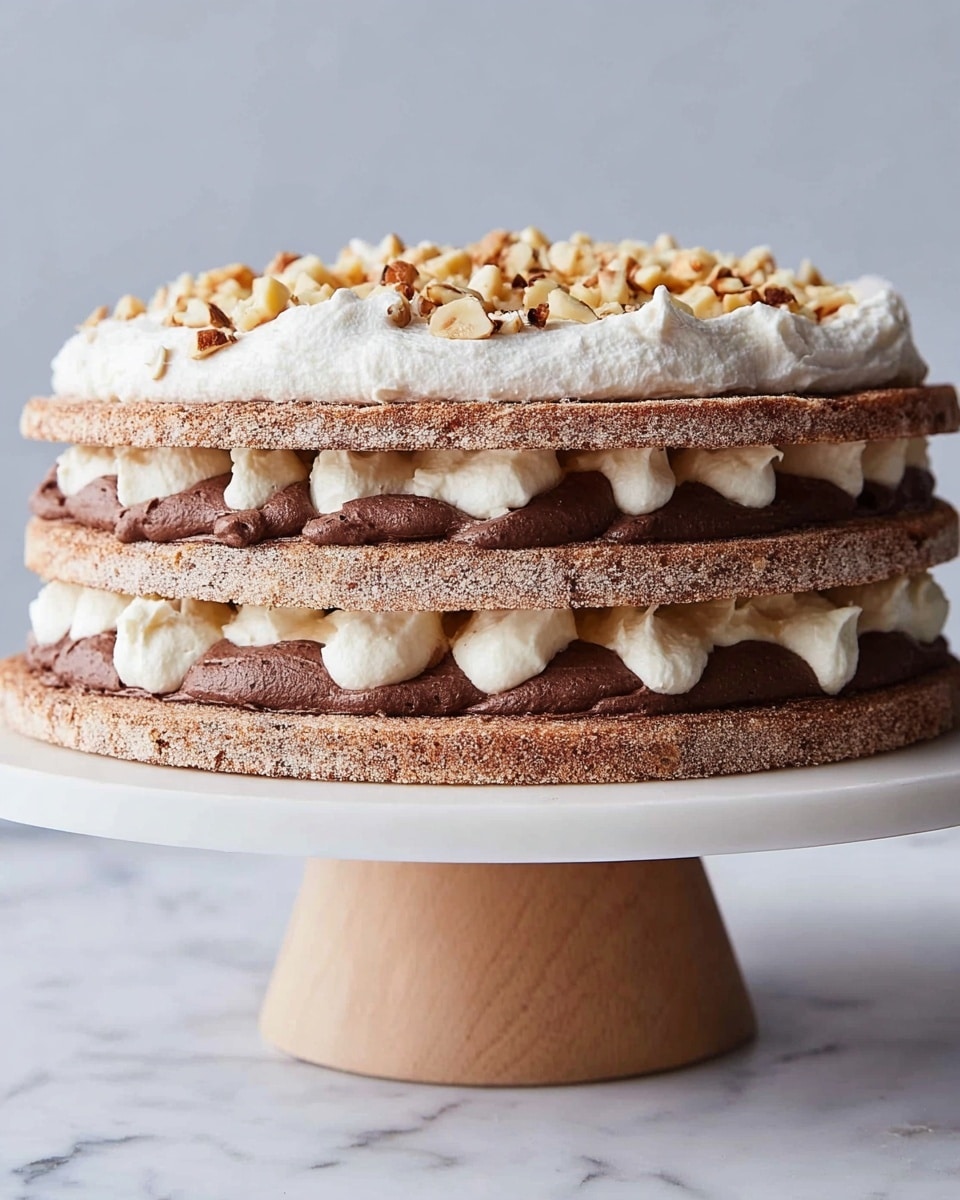
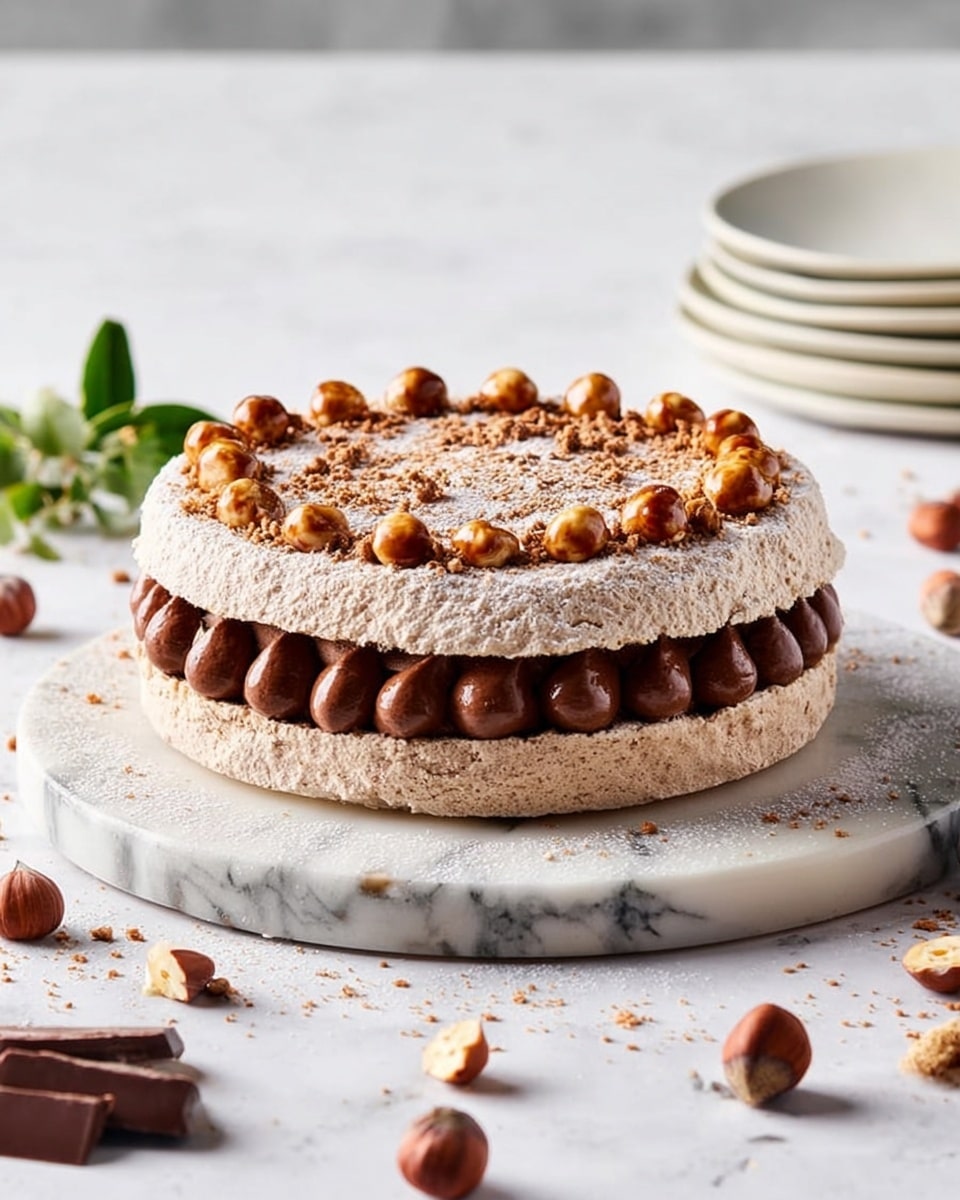
Chocolate Dacquoise is a delicate French dessert featuring crisp meringue layers with a rich chocolate and hazelnut filling. Its combination of textures and flavors makes it an impressive yet approachable treat for special occasions or a luxurious weekend dessert.
Ingredients
- 3/4 cup plus 2 tablespoons (210g) egg whites, from about 6 large eggs, at room temperature
- 1/4 teaspoon cream of tartar
- Pinch of table salt
- 1 cup (198g) granulated sugar, superfine preferred
- 3/4 cup (50g) King Arthur Almond Flour or hazelnut flour
- 1/4 cup (21g) unsweetened cocoa, Dutch-process or natural
- 3 caramel candies
- 1 1/2 cups (340g) heavy cream, divided
- Pinch of table salt
- 2 tablespoons (17g) confectioners’ sugar
- 8 tablespoons (113g) unsalted butter, room temperature
- 1/2 cup (152g) chocolate-hazelnut spread, such as Nutella or JIF
- 1/2 teaspoon King Arthur Pure Vanilla Extract
- 1 cup (113g) confectioners’ sugar, sifted
- Hazelnuts, toasted and chopped, for garnish
Instructions
- Step 1: Preheat the oven to 225°F and place two racks equidistant from top and bottom. Trace three 8-inch circles on two pieces of parchment paper, then turn the parchment over so the ink side is down on two baking sheets.
- Step 2: In a stand mixer bowl, combine egg whites, cream of tartar, and salt. Beat on medium speed until fine bubbles form, then increase to medium-high and whip until soft peaks form. Gradually add sugar while mixing until stiff, shiny peaks form but the meringue is not dry.
- Step 3: In a small bowl, whisk together almond or hazelnut flour with cocoa powder. Sprinkle half the mixture over the whipped egg whites and gently fold in using a spatula. Repeat with the remaining flour and cocoa until the batter is smooth and evenly colored.
- Step 4: Using a piping bag or spatula, spread the batter evenly within the drawn circles on the parchment paper to form disks.
- Step 5: Bake the disks for 1 hour. Then turn off the oven and leave the disks inside to dry for at least 3 hours or overnight.
- Step 6: To make the caramel whipped cream, place caramel candies and 1/2 cup of heavy cream in a heatproof bowl. Warm in the microwave in 20-second intervals, stirring until smooth. Stir in remaining heavy cream. Chill this mixture in the refrigerator for at least 1 hour.
- Step 7: Beat the chilled caramel cream until soft peaks form. Add a pinch of salt and confectioners’ sugar, then beat until medium peaks hold.
- Step 8: For the hazelnut filling, combine butter, chocolate-hazelnut spread, vanilla extract, and sifted confectioners’ sugar in a mixer bowl. Whip with the whisk attachment until smooth and fluffy.
- Step 9: To assemble, place one meringue disk on a serving plate. Pipe small spheres of hazelnut filling on it, leaving gaps for the caramel whipped cream. Spread one-third of the caramel cream over the filling. Top with the second disk and repeat layering hazelnut filling and caramel cream. Finish with the last disk and spread remaining whipped cream on top. Garnish with toasted chopped hazelnuts.
Tips & Variations
- Use superfine sugar for a smoother meringue texture and quicker dissolving during whipping.
- Swap almond flour for hazelnut flour for a more pronounced nutty flavor.
- Letting the meringue disks dry overnight ensures they hold their crispness longer once assembled.
- For added richness, fold a tablespoon of finely chopped toasted hazelnuts into the hazelnut filling.
Storage
Store leftover dacquoise covered in the refrigerator for up to 2 days. Note that the meringue layers will soften over time as they absorb moisture from the filling. For best texture, enjoy the dessert the day it is assembled. Reheat is not recommended to preserve the crispness of the meringue.
How to Serve
Serve this delicious recipe with your favorite sides.
FAQs
Can I make the meringue layers ahead of time?
Yes, you can bake and dry the meringue disks up to a day in advance. Store them in an airtight container to maintain crispness before assembling the cake.
What can I substitute if I don’t have hazelnut spread?
If you don’t have hazelnut spread, you can use melted chocolate combined with a bit of hazelnut butter or simply use chocolate buttercream for a similar flavor and texture.
PrintChocolate Dacquoise with Hazelnut and Caramel Whipped Cream Recipe

Chocolate Dacquoise is a delicate and elegant layered dessert featuring crisp almond and cocoa meringue discs filled with luscious caramel whipped cream and a creamy hazelnut butter filling. This French-inspired cake combines nutty flavors and rich chocolate notes with a light airy texture, making it a sophisticated treat perfect for special occasions.
- Prep Time: 30 minutes
- Cook Time: 1 hour
- Total Time: 4 hours 30 minutes (includes drying and chilling times)
- Yield: Serves 8
- Category: Dessert
- Method: Baking
- Cuisine: French
Ingredients
Dacquoise Discs
- 3/4 cup plus 2 tablespoons (210g) egg whites, from about 6 large eggs, at room temperature
- 1/4 teaspoon cream of tartar
- Pinch of table salt
- 1 cup (198g) granulated sugar, superfine preferred
- 3/4 cup (50g) King Arthur Almond Flour or hazelnut flour
- 1/4 cup (21g) unsweetened cocoa, Dutch-process or natural
Cream Filling
- 3 caramel candies
- 1 1/2 cups (340g) heavy cream, divided
- Pinch of table salt
- 2 tablespoons (17g) confectioners’ sugar
Hazelnut Filling
- 8 tablespoons (113g) unsalted butter, room temperature
- 1/2 cup (152g) chocolate-hazelnut spread such as Nutella or JIF
- 1/2 teaspoon King Arthur Pure Vanilla Extract
- 1 cup (113g) confectioners’ sugar, sifted
- Hazelnuts, toasted and chopped (for garnish)
Instructions
- Preheat and Prepare Parchment: Preheat the oven to 225°F (107°C) and place two oven racks equidistant from the top and bottom. Trace three 8-inch circles on two pieces of parchment paper and flip the parchment over onto two baking sheets (ink side down).
- Make the Meringue Base: In a stand mixer bowl, combine egg whites, cream of tartar, and salt. Beat on medium speed until fine bubbles form, then increase to medium-high until soft peaks develop. Gradually add sugar while continuing to whip until stiff, glossy peaks form without dryness.
- Fold in Dry Ingredients: In a separate bowl, whisk together the almond or hazelnut flour and cocoa powder. Sprinkle half the dry mixture over the beaten egg whites and gently fold in with a spatula. Add the remaining dry mix and fold just until evenly combined and the batter is thick and smooth.
- Shape the Discs: Using a piping bag or spatula, spread or pipe the batter evenly within the traced circles on the parchment paper to form three discs.
- Bake and Dry the Discs: Bake the discs for 1 hour at 225°F. Then turn off the oven and leave the discs inside to dry for at least 3 hours or overnight for best texture.
- Prepare Caramel Whipped Cream: Place caramel candies and 1/2 cup heavy cream in a microwave-safe bowl; heat in 20-second bursts, stirring until smooth. Stir in remaining 1 cup heavy cream. Chill this mixture in the stand mixer bowl in the refrigerator for at least 1 hour.
- Whip Caramel Cream: Once chilled, whip the caramel mixture until soft peaks form. Add a pinch of salt and confectioners’ sugar and continue whipping until medium peaks hold.
- Make Hazelnut Filling: In the mixer bowl, beat unsalted butter, chocolate-hazelnut spread, vanilla extract, and sifted confectioners’ sugar with the whisk attachment until fluffy and smooth.
- Assemble the Dacquoise: Place one meringue disc on a serving plate. Pipe marble-sized dollops of hazelnut filling onto the disc, leaving spaces for the caramel whipped cream. Spread one-third of the caramel whipped cream over the filling. Top with the second disc and repeat with hazelnut filling and caramel cream. Place the final disc on top and cover with the remaining caramel cream. Garnish with toasted chopped hazelnuts.
- Storage: Refrigerate leftover dacquoise for up to 2 days. Note that the meringue layers will soften over time but the flavors will deepen.
Notes
- For best results, use superfine sugar to create a smooth meringue texture.
- Do not overbeat the meringue to avoid dryness; stiff but glossy peaks are ideal.
- Almond flour can be substituted with hazelnut flour for a nuttier flavor.
- Allowing the dacquoise discs to dry overnight improves their crispness and texture.
- Use good quality chocolate-hazelnut spread for the filling to enhance taste.
- Chilling the caramel cream before whipping ensures it whips properly and has a light texture.
- Store the assembled cake refrigerated and consume within 2 days to enjoy optimal texture.
Keywords: Chocolate Dacquoise, French dessert, almond meringue, hazelnut filling, caramel whipped cream, layered cake