Gluten-Free Oreo Cheesecake Recipe
Introduction
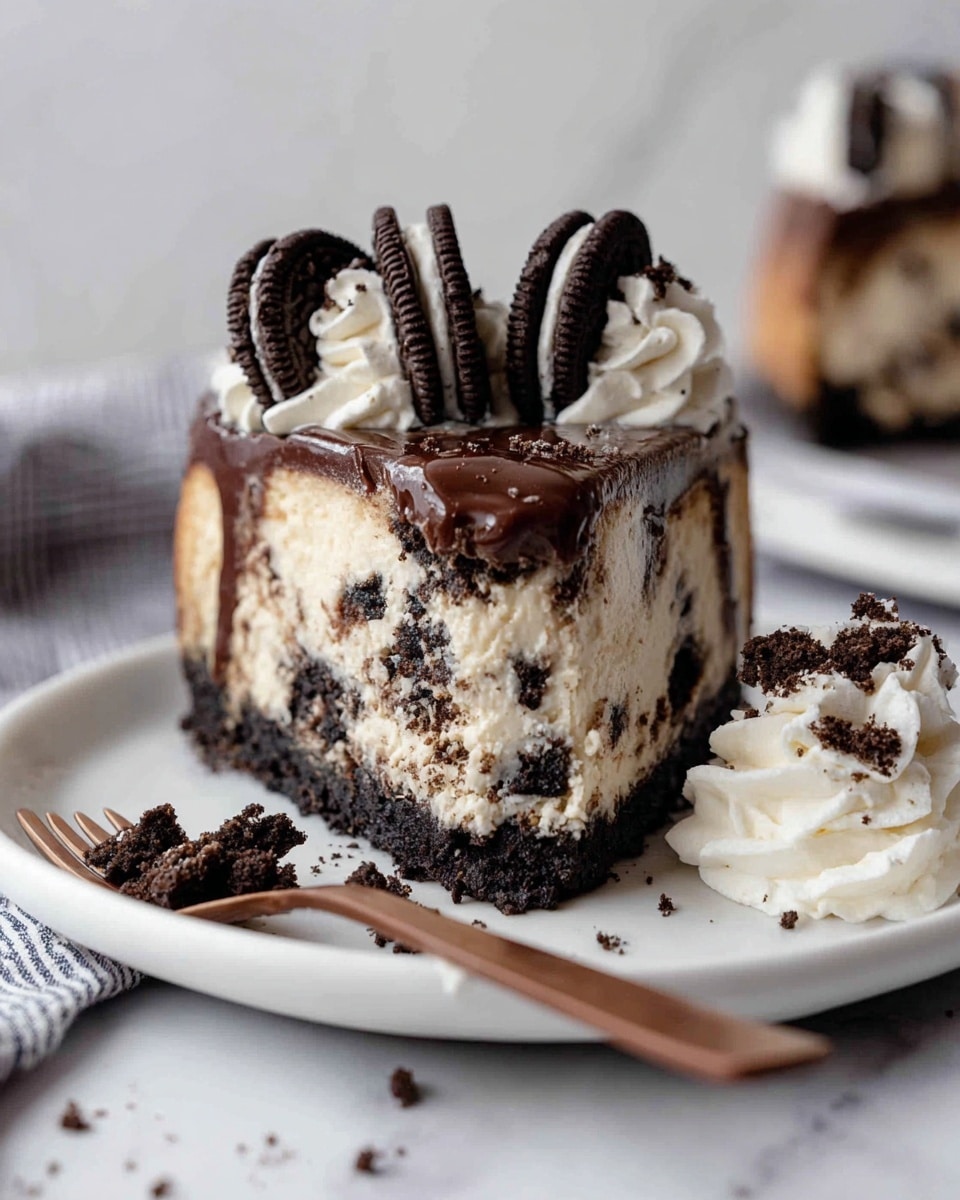
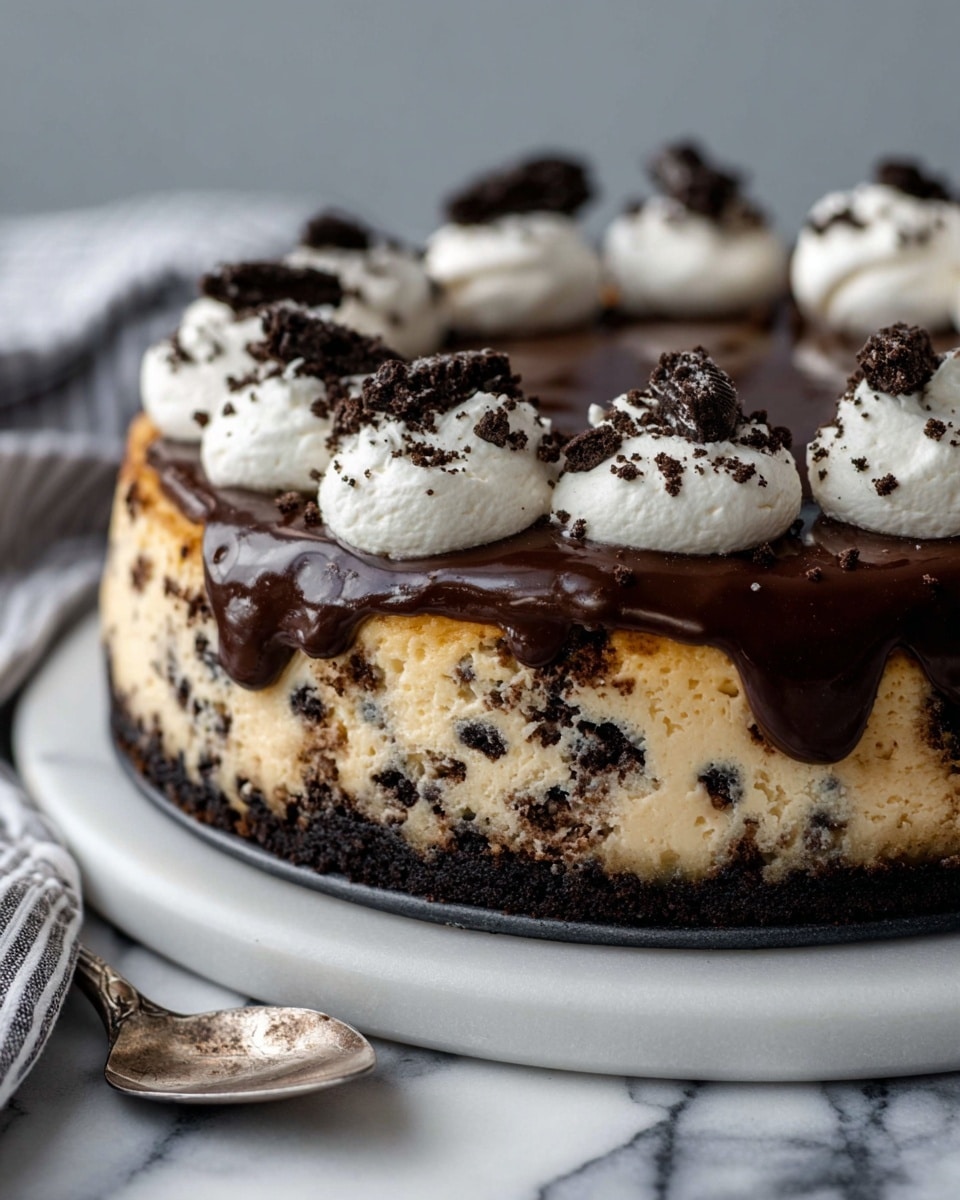
This gluten-free Oreo cheesecake is a decadent dessert that combines a crisp cookie crust, creamy filling studded with Oreo chunks, and a rich chocolate ganache topping. Perfect for Oreo lovers and those avoiding gluten, it’s a crowd-pleaser that’s surprisingly easy to make at home.
Ingredients
- 20 gluten-free Oreo cookies (2 packages total)
- 4 tablespoons unsalted butter
- 32 ounces (4 packages) full-fat cream cheese, softened
- 1 cup granulated sugar
- 1 cup full-fat sour cream
- 3 large eggs, room temperature
- 1 teaspoon vanilla extract
- 15 gluten-free Oreo cookies, crushed into larger chunks
- ½ cup heavy cream
- 1 cup semi-sweet chocolate chips
- ¾ cup heavy cream
- 1 teaspoon vanilla extract
- 2 tablespoons powdered sugar
- 2-3 gluten-free Oreo cookies, crushed (for decorating)
Instructions
- Step 1: Preheat the oven to 350°F. Crush 20 gluten-free Oreo cookies into fine crumbs using a food processor or by placing them in a ziplock bag and crushing with a rolling pin.
- Step 2: Mix the cookie crumbs with the melted butter until combined. Press the mixture firmly along the bottom of a 9-inch springform pan using a measuring cup or glass. Bake for 10 minutes, then remove and let cool.
- Step 3: Lower the oven temperature to 325°F. In a large bowl or stand mixer fitted with a paddle attachment, beat the cream cheese and granulated sugar until smooth and creamy, about 1-2 minutes.
- Step 4: Add the sour cream, eggs, and 1 teaspoon vanilla extract to the cream cheese mixture. Beat until well combined and smooth.
- Step 5: Crush the remaining 15 gluten-free Oreos into larger chunks (not fine crumbs). Fold these Oreo pieces gently into the cheesecake filling.
- Step 6: Pour the filling into the pre-baked crust and smooth the top with an offset spatula. Place the cheesecake on a foil-lined baking sheet to catch any drips.
- Step 7: Bake in the 325°F oven for 50-60 minutes until the edges are set and a toothpick inserted in the center comes out without wet batter.
- Step 8: Turn off the oven and leave the cheesecake inside with the door slightly open for 15 minutes. Then remove and let cool completely on a wire rack.
- Step 9: Chill the cheesecake in the refrigerator for at least 4 hours or overnight. Do not remove the springform ring until fully chilled to prevent cracking.
- Step 10: For the chocolate ganache, heat ½ cup heavy cream in a small saucepan until hot but not boiling. Pour over the chocolate chips and let sit for 1 minute, then stir until smooth.
- Step 11: Run a knife around the edge of the chilled cheesecake to release it from the springform ring. Place the cheesecake on a serving platter.
- Step 12: Pour the ganache onto the center of the cheesecake and smooth with an offset spatula, letting it drip just over the edges. Refrigerate for 20 minutes to set.
- Step 13: To make the whipped cream, beat ¾ cup heavy cream with 1 teaspoon vanilla extract and 2 tablespoons powdered sugar until soft peaks form.
- Step 14: Pipe whipped cream around the edge of the cheesecake using a star or round tip. Sprinkle with crushed Oreo crumbs for decoration.
- Step 15: Serve immediately or store in the refrigerator until ready to enjoy.
Tips & Variations
- Use full-fat dairy products for the creamiest texture and best flavor.
- To crush Oreos quickly without a food processor, place cookies in a sealed bag and hit gently with a rolling pin.
- For a different flavor, try swapping semi-sweet chocolate chips with dark or milk chocolate.
- Letting the cheesecake cool gradually in the oven helps prevent cracks on the surface.
Storage
Store leftover cheesecake covered in the refrigerator for up to 4 days. Keep well wrapped to avoid drying out. For best texture, let slices come to room temperature for about 15 minutes before serving. You can also freeze the cheesecake (without whipped cream topping) wrapped tightly in plastic wrap and foil for up to 2 months. Thaw overnight in the refrigerator.
How to Serve
Serve this delicious recipe with your favorite sides.
FAQs
Can I use regular Oreos instead of gluten-free?
Yes, you can substitute regular Oreos if gluten is not a concern, but be sure to check the filling ingredients if you have other dietary restrictions.
Why did my cheesecake crack?
Cracking often happens due to rapid temperature changes or overbaking. Baking at a lower temperature and allowing the cheesecake to cool gradually in the slightly opened oven helps prevent cracks.
PrintGluten-Free Oreo Cheesecake Recipe
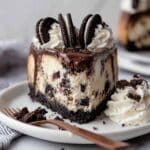
This Gluten-Free Oreo Cheesecake features a rich and creamy full-fat cream cheese filling embedded with chunky gluten-free Oreo cookies, all set on a buttery gluten-free Oreo crust. Topped with a decadent chocolate ganache and fluffy whipped cream adorned with extra cookie crumbs, this dessert is perfect for Oreo lovers seeking a gluten-free indulgence.
- Prep Time: 20 minutes
- Cook Time: 1 hour 10 minutes
- Total Time: 5 hours 30 minutes
- Yield: 12 servings 1x
- Category: Dessert
- Method: Baking
- Cuisine: American
- Diet: Gluten Free
Ingredients
Cheesecake Crust
- 20 gluten-free Oreo cookies (2 packages total)
- 4 tablespoons unsalted butter, melted
Cheesecake Filling
- 32 ounces (4 packages) full-fat cream cheese, softened
- 1 cup granulated sugar
- 1 cup sour cream, full-fat
- 3 large eggs, room temperature
- 1 teaspoon vanilla extract
- 15 gluten-free Oreo cookies, crushed into larger chunks
Chocolate Ganache
- ½ cup heavy cream
- 1 cup semi-sweet chocolate chips
Whipped Cream
- ¾ cup heavy cream
- 1 teaspoon vanilla extract
- 2 tablespoons powdered sugar
- 2–3 gluten-free Oreo cookies, crushed (for decorating)
Instructions
- Preheat and Prepare Crust: Preheat your oven to 350°F. Crush 20 gluten-free Oreo cookies into fine crumbs using a food processor or a ziplock bag with a rolling pin. Mix the crumbs with melted butter until combined.
- Form and Bake Crust: Press the buttered crumbs firmly into the bottom of a 9-inch springform pan using a measuring cup or glass. Bake the crust for 10 minutes, then remove and let cool.
- Prepare Cheesecake Filling: Lower oven temperature to 325°F. In a large bowl or stand mixer fitted with a paddle attachment, beat together softened cream cheese and granulated sugar until smooth and creamy, approximately 1-2 minutes. Add sour cream, eggs, and vanilla extract, beating until fully combined and smooth.
- Fold in Oreo Chunks: Slightly crush the remaining 15 gluten-free Oreo cookies into larger chunks. Gently fold these chunks into the cheesecake filling mixture to disperse them evenly.
- Assemble and Bake Cheesecake: Pour the filling over the pre-baked crust and smooth the top with an offset spatula. Place the springform pan on a foil-lined baking sheet to catch drips. Bake at 325°F for 50-60 minutes until the edges are set and a toothpick inserted near the center comes out mostly clean.
- Cool Cheesecake: Turn off the oven and leave the cheesecake inside with the door ajar for 15 minutes. After this, remove the cheesecake and cool completely on a wire rack. Once mostly cooled, refrigerate for at least 4 hours or overnight without removing the springform ring.
- Make Chocolate Ganache: Heat ½ cup heavy cream in a small saucepan until hot but not boiling. Pour over the semi-sweet chocolate chips in a bowl and let sit for 1 minute. Stir until smooth and glossy.
- Decorate with Ganache: Run a knife around the springform ring to loosen the cheesecake and remove the outer ring. Place the cheesecake base on a serving platter. Pour the chocolate ganache onto the center and spread with an offset spatula so it slightly drips over the edges. Refrigerate for about 20 minutes to set.
- Prepare Whipped Cream: Using a mixer with a whisk attachment, whip ¾ cup heavy cream with vanilla extract and powdered sugar until soft peaks form that hold their shape.
- Final Decoration: Using a piping bag fitted with a large star or round tip, pipe mounds of whipped cream around the edge of the cheesecake. Sprinkle crushed gluten-free Oreo cookie crumbs on top. Serve immediately or keep refrigerated until serving.
Notes
- Use full-fat cream cheese and sour cream for the best creamy texture.
- Room temperature eggs incorporate more smoothly into the batter.
- Don’t overmix the cheesecake batter to avoid cracks.
- Allow the cheesecake to chill completely for clean slicing.
- Crushing Oreo cookies into larger chunks for the filling provides texture contrasts.
- The foil-lined baking sheet catches butter drips and keeps your oven clean.
- Use gently crushed Oreos as decoration for a beautiful finish.
Keywords: Gluten-Free Oreo Cheesecake, gluten-free dessert, Oreo cheesecake, chocolate ganache cheesecake, no gluten desserts